
Change the colour of objects in your images
This workshop will introduce you to using layer masks, to make image adjustments.
Please Note: It would be beneficial to read through the whole tutorial before you begin to make yourself aware of the numerous shortcuts that are mentioned, also some paragraphs are cross referenced.
If you would like a print out to read, please follow the links at the end of this workshop.
Please note: it is not possible to change the colours black and white using the methods shown in this workshop.
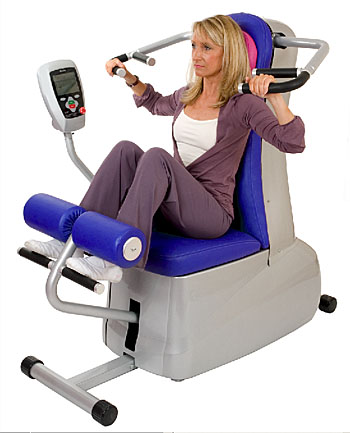
This was a commercial shot I took for a ladies only exercise centre. After the shoot was complete, the customer came back to me, and asked if I could change the colour of the exercise machine cushions. In this workshop I’ll show you how I went about doing this.
For demonstration purposes I’m going to change the cushion colour to “red”.
This is the Image I captured at the photo shoot.

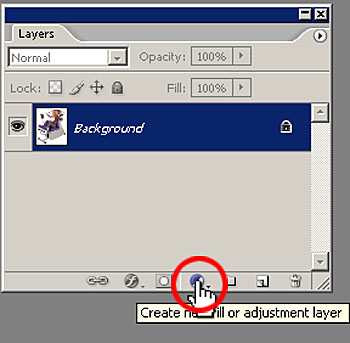
Step 1: Make sure you can see your layers pallet. If you are unable to see the layers pallet, Go to Window>Layers, or press F7 on your keyboard.
Step 2: In the layers palette click on the half black and half white circle. This is the “create new fill or adjustment layer” icon.
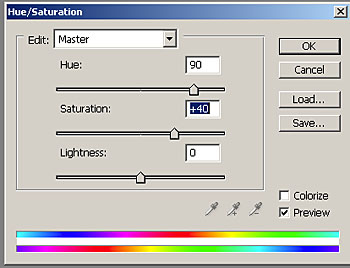
In the flyout menu, click on, Hue/Saturation. This will create a “Hue/Saturation 1” layer in the layers palette, and also open the Hue/Saturation box. In the Hue/Saturation box leave Edit set to master and adjust the Hue and Saturation sliders to create the colour your require. I used Hue 90, Saturation +40, Lightness 0. This is slightly over saturated, but it is OK for this demonstration.
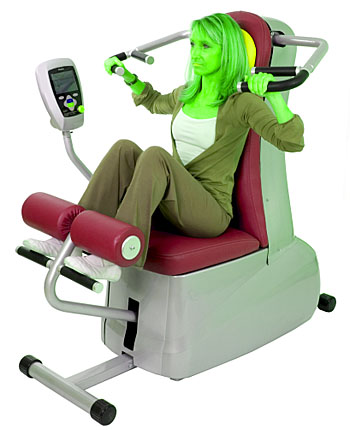
You will notice that the Hue/Saturation adjustments effect all of the colours in the image. This is not a problem, click OK to accept the adjustments.
This is what my image now looks like. I have my red cushion colour, but some strange colours elsewhere.
Your layers palette should now look like this, with a new “Hue/Saturation 1” layer.

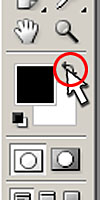
Step 3: Click the default “foreground and background colours” icon in the toolbox.
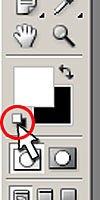
Then click the “switch foreground and background colours” icon, so that black is the foreground colour.
Step 4: With the “Hue/Saturation 1” layer active (shown in blue), select the paint bucket tool, (keyboard short cut, G). With the paint bucket tool selected, click the cursor into your image. This will put everything back to the original colours.
Step 5: Now we are going to paint the new cushion colours on. Zoom in on the area of the image where you are going to start painting. The higher the magnification the better, as we need to work to fine edges.
Step 6: Switch your foreground and background colours so white is the foreground,
(keyboard short cut, X)
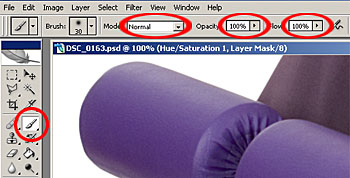
Step 7: Select the paint brush tool, (keyboard short cut, B). Make sure the paint brush options are set to, mode normal, opacity 100% and flow 100%.
Step 8: Adjust the brush to a manageable size so you can paint to fine edges. A very useful keyboard short cut to change the brush size, are the square brackets, located to the right of the letter P. The left hand square bracket tool decreases the size of the brush, and the right square bracket increases the brush size.
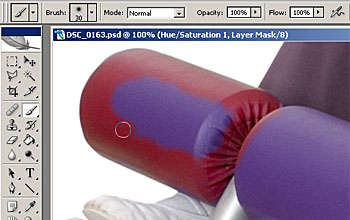
Step 9: With the “Hue/Saturation 1” layer active (shown in blue) start to paint (using foreground set to white) over the parts of the image where you want to retrieve the colour adjustments we made earlier. Move around the image painting over all the areas where you need to retrieve the colour. Use the square bracket keys to increase and decrease the size of the brush as you go.
Another useful short cut to move around an image while zoomed in, is the spacebar on the keyboard. Pressing the spacebar will change your cursor into the hand tool. By holding down the spacebar click and drag your mouse to move the image. This saves zooming and re-zooming into a different part of the image.
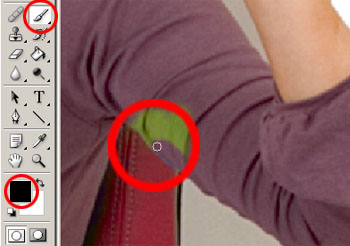
Step 10: Below our painting effect is almost complete. But there are a couple of areas where I have slipped with my brush tool. One area is on the arm, the other around the bottom area of the model.
To correct this we need to switch our foreground and background colours, so that black is the foreground, (keyboard short cut, X). With the foreground colour set to black, and the
“Hue/Saturation 1” layer active, zoom in, and with a small brush paint over the mistake areas. This will retrieve the original colours.
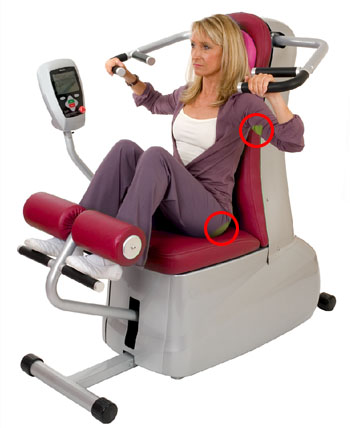
Your image should now be complete.
If you are happy with the colour adjustments you made, then this workshop for you is now completed.
Step 11: If you are unhappy with the colour you choose, this is not a problem, because now it is very easy to change using the “Hue/Saturation 1” adjustment layer. To change the colour, double click on the “Hue/Saturation 1” thumbnail.
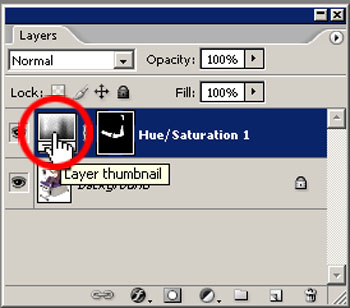
This will bring up the Hue/Saturation box, you can now adjust the Hue and Saturation sliders to create a new colour, and it will only effect the colour in the layer mask. I changed the Hue -30, Saturation +50 and lightness 0 to create a blue colour.
This workshop shows you why you should use layer masks to adjust your images, because if you make mistakes, or would like to make adjustments at a later stage, it makes it very easy to do so.
To download a printable version of this workshop, click on the link below