
Installing and Using Printer Profiles
This workshop will explain how to install and use your custom print profiles.
It would be beneficial to read the complete workshop before you attempt to follow the procedure. If you would like a print out to read, please follow the links at the end of this workshop.
Step 1: If you have Photoshop open on your computer, close it down before you continue with this workshop.
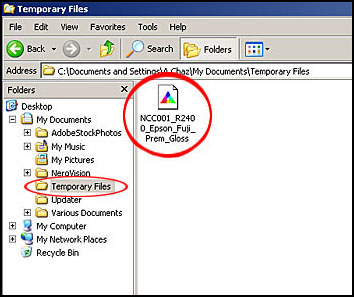
Step 2: If you have received your print profile by email, firstly you need to save the ICC Profile attachment to a convenient location on your computer, where you will be able to locate it later in this workshop. If you have collected your print profile on a key/pen drive you will also need to transfer the ICC profile from your key/pen drive to a convenient location on your computer, where you will be able to locate it later in this workshop. For the purpose of this workshop my ICC profile name is “NCC001_R2400_Epson_Fuji_Prem_Gloss” (your profile name will differ slightly, but will start with the “NCC” prefix) which I have saved to a “Temporary Files” folder within “My Documents”.
Step 3: Open up “Windows Explorer”. A quick way of doing this is to click the right hand mouse button on the “Start” button in the bottom left hand corner of your computer screen. In the flyout menu box, left click on “Explore”. Now you are in the “Windows Explorer” section of your computer. You now need to locate the ICC profile you have just saved from email or transfer from a key/pen drive. My profile is located in a “Temporary Files” folder within “My Documents”.
Your Windows Explorer may be visually different to this view, this is due to the way your Windows system is set up.
Step 4: Next we need to install the ICC profile. To do this, click your right hand mouse button on the ICC profile name within Windows explorer. This will open up a flyout menu box. At the top of the menu box you will see “Install Profile”.
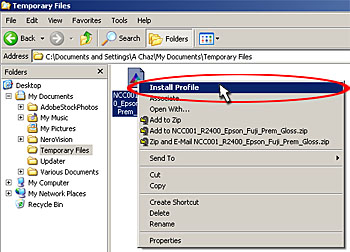
Step 5: With your left hand mouse button click on “Install Profile”. This will automatically install the ICC profile into the correct location on your computer. If no warning or failed install messages appear after clicking “Install Profile”, your profile has been installed correctly and will be made available to use for printing within Photoshop.
If the profile fails to install correctly more experienced users could manually transfer the profile into the following folder within Windows, C:\WINDOWS\system32\spool\drivers\colour. If you are having problems and you are unable to install the profile, please contact one of your colour management club members.
The profile is now installed and ready to use.
At the start of the “How to get a print profile” workshop we changed our Photoshop colour settings to use “sRGB ICE61966-2.1” working space, so now occasionally when opening images in Photoshop we may be faced with an Embedded Profile Mismatch or Missing Profile warning. Various options are given, in general go for the “sRGB” colour option. Under no circumstances choose the “Don’t Colour Manage” option. This is only used for printing the profile targets.
Using Printer Profiles
Note: When we printed the target profile it was printed as a portrait. If you are printing landscape images I would recommend that you rotate the image into a portrait before printing, by going to Image/Rotate Canvas>90 CW. This will save a lot of confusion when using the custom settings.
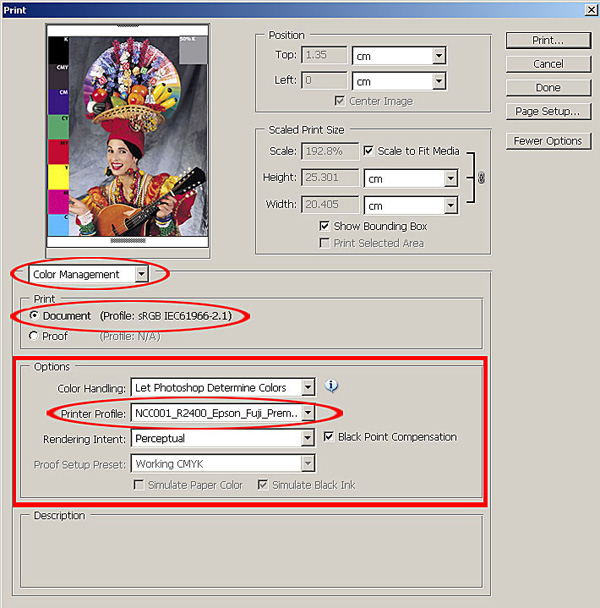
When you are ready to use your ICC profile to print an image, you need to go to File>Print with Preview. In “Print with Preview” dialog box you will see your image in the top left hand corner. If you wish to use the “Scale to Fit Media” option you are now free to do so. In the “How to get a print profile” workshop we un-ticked this box to print the target profile. Under your image preview, click the arrow on the right hand side to select “Colour Management”. In the “Print” box select “Document (Profile sRGB IEC6199-2.1)”. In the “Options” box select “Let Photoshop Determine Colours” from the Colour Handling Menu. In the “Printer Profile” box, click the arrow on the right hand side and select the printer profile you have just installed. The “Rendering Intent” should be set to “Perceptual” and the “Black Point Compensation” should be ticked. Then click Print.
Note: Using Custom Settings on A3 Papers.
The custom settings we used to create the profiles were all based around A4 paper. So when we load the custom settings the paper will default to A4. If you are printing on A3 paper you will need to change your paper size. How do we do this?
Follow the instructions below for your printer type to load the custom settings for your printer. Just before you click Ok to print the image, go into the paper options and change the paper size to A3.
Printing, Using Custom Settings, Epson 1290/1290s
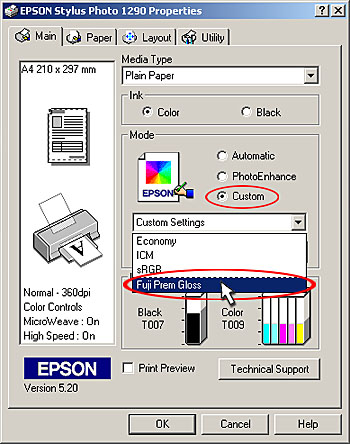
If you are using an Epson 1290/1290s, select “Custom” from the main print properties dialog box, then click the arrow next to “Custom Settings”. In the “Custom Settings” drop down menu select “Fuji Prem Gloss”, (you will need to select the custom name you created in the “How to get a print profile” workshop) this will load all the settings we created to print the target file on the Fuji Premium Gloss paper, (see note above for A3 papers), Click Ok. (Follow onto “Finally, All Printers”, below).
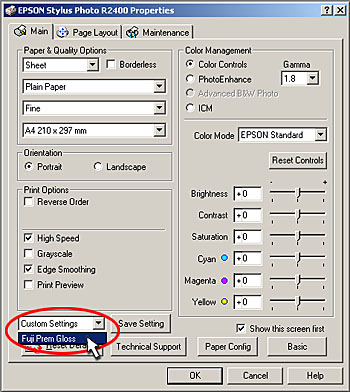
Printing, Using Custom Settings, Epson 1400 Series, R1800, R1900 and R2400
When printing with Epson 1400 Series, R1800, R1900 and R2400, you firstly need to navigate your way onto the advanced page of your printer properties dialog box as you did to create the settings for the target print profile. Once on this page, Click the arrow next to the “Custom Settings” box, located in the bottom left hand corner of the print properties box. In the “Custom Settings” drop down menu select “Fuji Prem Gloss”, (you will need to select the custom name you created in the “How to get a print profile workshop”) this will load all the settings we created to print the target file on the Fuji Premium Gloss paper, (see note above for A3 papers), Click Ok. (Follow onto “Finally, All Printers”, below).
Printing, Using Custom Settings, All Other Printers.
If you are using a printer other than those listed above, you need to follow the same procedure you used to create the custom settings for printing the target file. By following this procedure you will be able to locate and load the custom settings, (see note above for A3 papers).
Finally (All Printers)
After clicking OK in your printer properties dialog box, the custom settings you created to produce the target print file will be loaded. The printer will now use the ICC profile and your custom settings to produce a perfectly colour balanced print for your printer, paper and ink combination.
You can create many different ICC profiles for varying combinations of paper and inks, but remember to name the custom settings relating to those combinations. This makes it easy to identify and load the correct settings for the paper and ink combination you are using.
To download a printable version of this workshop, click on the link below