
Multiple Colour Borders, around your image.
The workshop will show you how to create multiple coloured borders around your images. Using “Canvas Size”.
Please note: It would be beneficial to read the complete workshop before you attempt to follow the procedure. If you would like a print out to read, please follow the links at the end of this workshop.
Before attempting this workshop, please read and follow my other workshop on, “Single coloured border around your image”. This will help you to find and understand the tools and pallets we are going to use in this workshop.
Note: For demonstration purpose of this workshop, the image I am using is only 140mm x 65mm. You may need to increase the border sizes for your image to get the same effect.
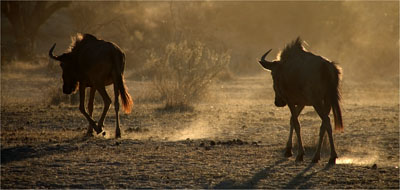
This is my start image.
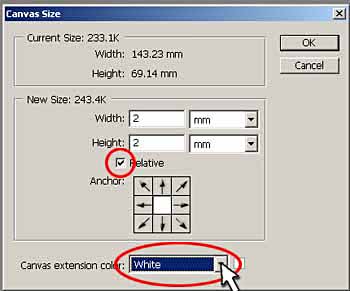
Step 1: Go to Image>Canvas Size, in the Canvas Size pallet make sure the Relative box is ticked. I’m going to set the Width 2mm and the Height 2mm. This will give me a 1mm border all around my image. For the Canvas Extension Colour I’m going to select White. Click OK
That will have given me my first border in White.
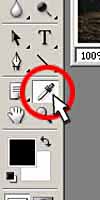
Step 2: The next border I am going to create is going to match one of the colours in my image. To do this I select the Eye Dropper tool, this can be found in the lower part of the tool box.
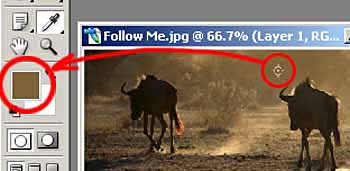
Step 3: Now with the Eye Dropper tool selected, move the cursor over the image and it will change into a crosshair. The centre of the crosshair is where your colour selection will be taken from. As you click around the image the selected area then becomes your foreground colour (see tool box). This will be the colour of your next border.
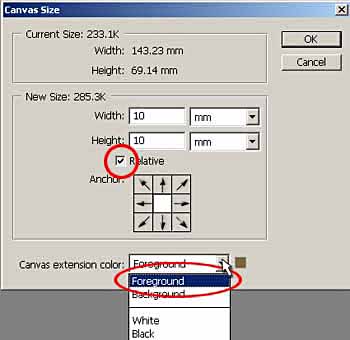
Step 4: With your colour selection made, go to Image>Canvas Size. This time I’m going to use a larger border, Width 10mm, Height 10mm (make sure Relative is ticked), this will give me a 5mm border all around my image. In the Canvas Extension Colour I’m going to selection Foreground. This is the colour we’ve just selected using the Eye Dropper tool. Click OK.
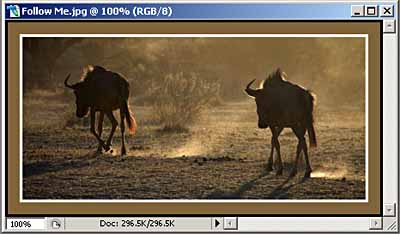
Your image now has 2 borders. The second border matches a colour from within your image.
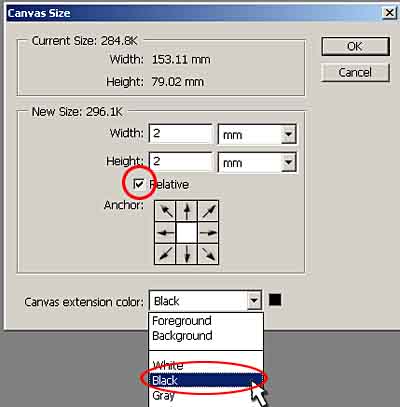
Step 5: Finally I’m going to add a third border in Black, to act as a stopper, to the edge of the image. Go to Image>Canvas Size, this time I set the Width 2mm and Height 2mm, again this will give me 1mm all around my image. For the Canvas Extension Colour I select Black. Click OK.
Your final image now has 3 multiple coloured borders.
To download a printable version of this workshop, click on the link below