
Setting Photoshop “Colour Settings” and “Preferences”
This workshop will show you how to set up Photoshop’s “Colour Settings” and “Preferences” for these workshops, using the “Colour Settings” and “Preferences” dialog boxes.
In this workshop there are references to “Default Setting”. If this is the first time you have accessed the Colour Settings and Preferences your default settings should match the dialog box images, but it is always worth checking they do. If you have previously accessed the Colour Settings and Preference and made changes, you will need to check and match all the dialog box settings.
Colour Settings
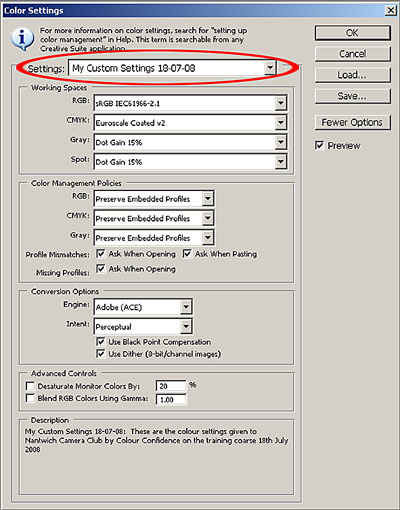
First we are going to set the “Colour Settings” within Photoshop. To do this, go to, Edit>Colour Settings. In the Colour Settings dialog box select “Custom” from the Settings drop down menu. In the Working Space set the RGB by selecting
“sRGB ICE61966-2.1” from the drop down menu. (In past lectures and instructions we have been instructed to use “Adobe RGB 1998” as a colour setting, but this is based on industry standards and not for home users. Monitors are not capable of displaying Adobe RGB and ink-jet printers cannot reproduce Adobe RGB, so it is pointless using anything other than sRGB!). Set the CMYK to “Euroscale Coated v2” and set both the Grey and Spot to “Dot Gain 15%”. In Colour Management Policies set the RGB, CMYK and Greys to “Preserve Embedded Profiles” and tick the 3 options boxes. In the Conversion Options set the Engine to “Adobe (ACE)” and set the Intent to “Perceptual” and tick the 2 options boxes. The Advance controls are set to 20% and 1.00 but un-ticked. Your Colour Settings should now match the Colour Settings dialog box shown below. If your dialog box doesn’t show all the options, click on the “More Options” button on the right hand side.
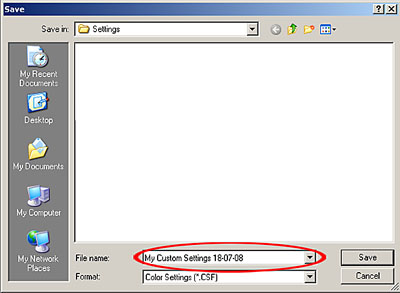
When you have matched all the settings in the dialog box, click “Save”. In the Save dialog box (see next page) we need to give our new custom settings a file name, I used “My Custom Settings 18-07-08”. I included the date in my file name so I know when the settings were created. Click Save.
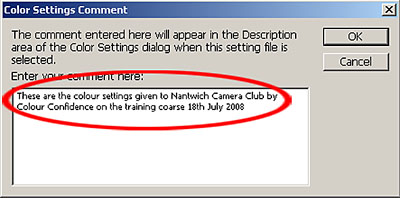
The next dialog box to appear is the “Colour Settings Comments”. Here you can make comments about your custom colour settings. I made a quick comment on where these settings had come from. Make your own comment or leave it blank. Click OK
Your Colour Settings dialog box should now look like this (see below). Settings will show your new custom settings name, and any comments you made will appear at the bottom. Click OK to save and apply these new custom settings.
Preferences
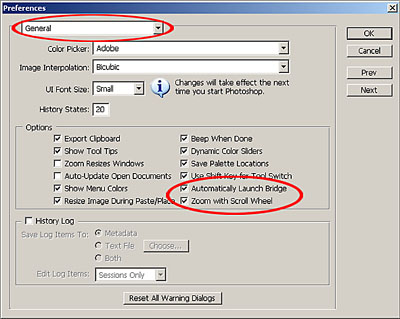
To set Photoshop “Preferences” go to Edit>Preferences>General
General
In the General dialog box accept the default settings of, Colour Picker set to “Adobe”, Image Interpolation set to “Bicubic”, UI Font Size set to “Small”. The History States defaults to 20. This means that Photoshop will keep a record of the last 20 operations you performed, so if you are unhappy with your operations you can backtrack to an earlier state. If you wish you could increase the history states to a higher figure which would give you more options to backtrack, but on a downside, a higher “History States” would use more of your Random Access Memory (RAM), which would slow Photoshop down. I would recommend that you use the default setting of 20.
The only other changes we are going to make are in the Options section. We need to tick “Automatically Launch Bridge” this will load the Bridge browser everytime we open Photoshop. The Bridge browser makes it very easy to locate and open our images into Photoshop. The other option we need to tick is “Zoom with Scroll Wheel” this allows the scroll wheel of your mouse to become a permanent zoom tool, this is a very useful short cut when working with your images. All other options should be left as the defaults and match the image below.
Click Next to continue
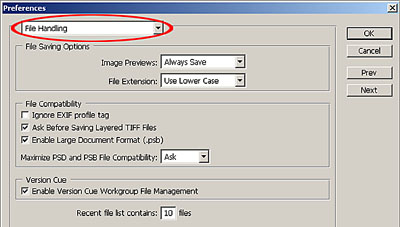
File Handling
The next dialog box is File Handling. The image below shows the File Handling default settings. You shouldn’t need to make any changes, but be sure that your default settings match these before you continue.
Click Next to continue
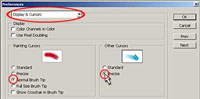
Display & Cursors
In the Display & Cursors dialog box set the Painting Cursors option to “Normal Brush Tip”, this will show us the size of the brush tip we are working with. You can also opt to use the “Show Crosshair in Brush Tip”, if you wish. Set the Other Cursors to “Precise”, this will show us a precise position of the tool we are using, instead of the standard default tool cursor.
Click Next to continue
Transparency & Gamut
The only option we need to change in this dialog box is the “Gamut Warning”. The Gamut Warning is an option in Photoshop that when activated will show us colours that are beyond the printing range of our inkjet printers (more about this at a later date). The Gamut Warning defaults to a mid grey, this should be changed to a more vivid colour which very rarely appears in the types of photographs we shoot. To change the Gamut Warning click
Click Next to continue
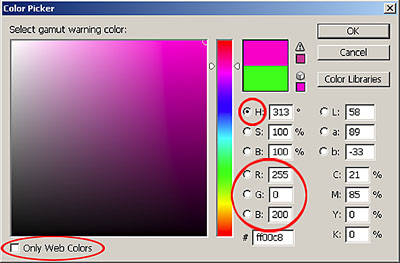
In the Colour Picker dialog box, first ensure the “Only Web Colours” is un-ticked. Next ensure the “H” radio button is on (black dot in it). At this point you can choose your own colour by using the colour picker or you can type these values into the RGB fields to give you an adequate vivid colour, R 255, G 0, B 200. These values have given us a bright pink, (85% Magenta). Click OK.
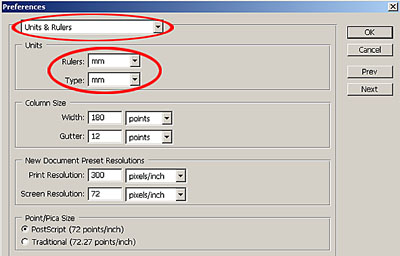
Units & Rulers
In the Units and Rulers dialog box the only options we need to change are under the Units option. Select “mm” from the drop down menus for both the Rulers and Type options. All other options should be left as the default settings (see image below).
Click Next to continue
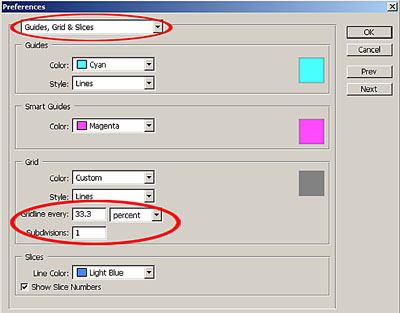
Guides, Grids & Slices
The only option we are going to change here are the Grid settings. In the “Gridline every” box, type 33.3 and change the measurement to percent from the drop down menu. In the “Subdivisions” field, change the default value setting of 4 to 1. When we now use the “View>Show> Grid” option in Photoshop our image will be divided into perfect thirds! To read more about using Grids, see page 91 of “The Photoshop CS2 book” by Scott Kelby. All the other options can be left as the defaults (see image below).
Click Next to continue
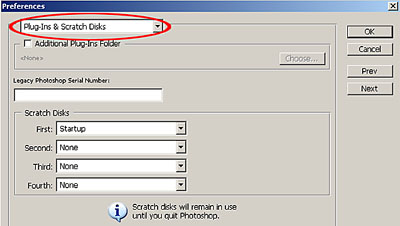
Plug-Ins & Scratch Disks
In this box accept all the default settings shown below.
Click Next to continue
Click Next to continue
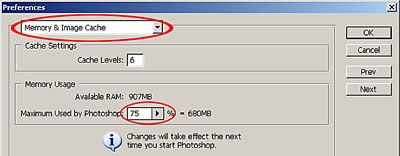
Memory & Image Cache
The option we need to change here is the “Memory Usage”. (Your available RAM may differ from the image below). We need to change this option to give Photoshop as much Random Access Memory (RAM) as possible. The RAM is the memory that Photoshop uses to process the operations we ask it to perform. The more RAM we can give to Photoshop the faster and smoother it will run. To allocate more RAM to Photoshop change the “Maximum Used by Photoshop” option to a value of 75%. If you input a higher value you could experience problems if you try to open more programs while running Photoshop.
Click Next to continue
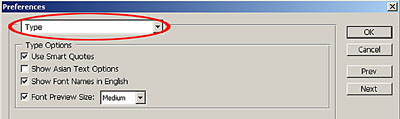
Type
In the Type options box accept all the default settings (see below).
All the Photoshop “Colour Settings” and “Preferences” are now set for use in these workshops. Click OK to accept these settings.
Click on the links below to download a printable version of this workshop. Warning: these are large files to download if you have not got a broadband connection.