
The Procedure for the Preperation of Projected Images for Club Competitions
This workshop will show you how to prepare your Landscape and Portrait images so they “best” fit the screen of the club digital projection system.
Please note: It would be beneficial to read the complete workshop before you attempt to follow the procedure. If you would like a print out to read, please follow the links at the end of this workshop.
Note: If your Images are not sized correctly for the club projection system, there is a high risk that your image will be degraded when projected.
1.Application
This procedure applies to images which are to be entered in Projected Image (PI) competitions and also to images which are to be projected to aid viewing as support to Print Competitions.
2.Objective
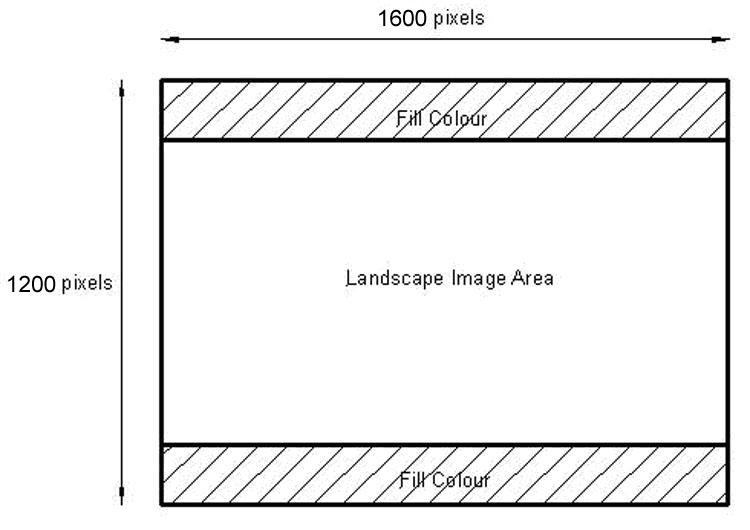
All images, both to landscape or portrait format, are to be contained within a framework which is 1600 pixels in width and 1200 pixels in height.
Clearly only a landscape format image which is precisely dimensioned to be 1600 x 1200 pixels will exactly fill the entire framework. More often, to satisfy composition consideration, there will be an unused area within the frame. This unused area is to be filled with a “fill colour” of the author’s choice (usually black).
For a landscape format image, i.e. where the width exceeds the height, the following illustrates a typical scenario.
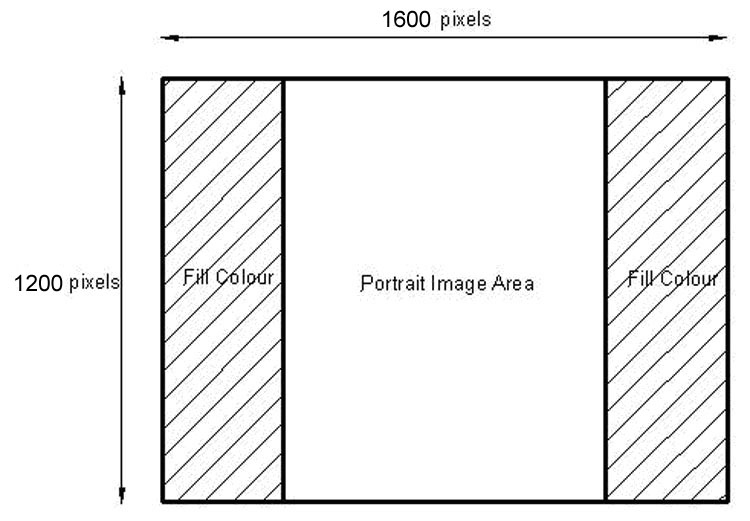
For a portrait format image, i.e. where the height exceeds the width, the following illustrates a typical scenario.
Section 3 below, shows how to use the crop tool in Adobe Photoshop to achieve the required results.
Please note that when a landscape format image dimensions verge more towards a square format, then the image needs to be prepared as a portrait image, to avoid the height exceeding 1200 pixels. Expressed more simply, if the image is cropped as a landscape image and this results in the height exceeding 1200 pixels, then it is necessary to re-crop as a portrait format image. Section 3 refers to these images as “over-sized images”.
It is recommended that images are flattened before you proceed to Section 3 Method; for this select Layers>Flatten Image.
Other image editing software usually provide similar tools to achieve the objectives of this procedure, but the process steps will differ to some extent from the method documented for Adobe Photoshop in section 3 below.
- Method
Preparing a Landscape Image.
Step 1: Open the landscape image you would like to crop. Locate and select your crop tool.

Step 2: In the crop options type 1600 px in the width box, leave the height blank (do not type 0, the crop tool will not work). Leave the resolution blank and the resolution type set to pixels/inch.

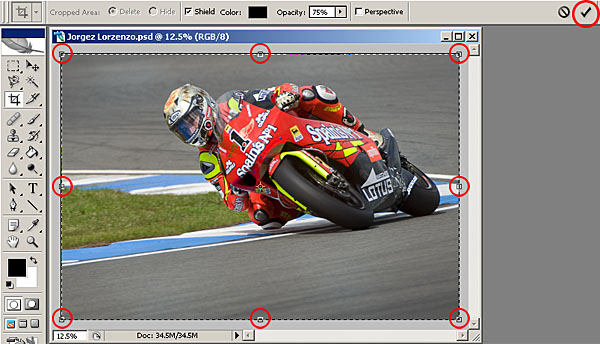
Step 3: Next click in the top left hand corner of your image, by holding down the mouse button, drag your cursor to the bottom right hand corner, then let go of the mouse button.
You should now see the crop selection around your image, also you will see 8 small squares, these are known as handles. If at this point you wish to use only part of the image or would like to change the shape of the crop, click and drag these handles to recompose your image. This will still resize your image to 1600 pixels width because that is the size we entered into the crop tool options in step 2.
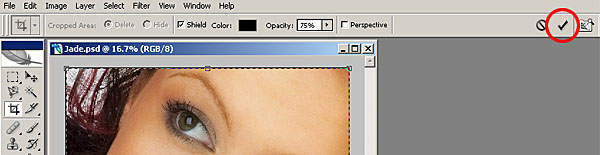
Once you are happy with either your full frame crop or your recomposed crop, click on the tick icon on the right hand side of the crop tool options (see below), or hit the enter key on your keyboard. This will apply the crop.
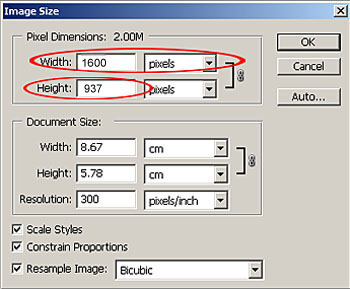
Step 4: Check your image size by going to, Image>Image Size. The image size box will appear. You will now see that your landscape image has a width of 1600 pixels, therefore this image will fit the full width of the club digital projection system. Ignore all the other information in this box apart from the image height. If the image height is below 1200 pixels this image is acceptable. Click OK to close image size box. If your image height is above 1200 pixels please read the section below on “Over sized images”.
Step 5: Next, follow the sections towards the end of this workshop on “Filling unused areas of the projection space”, “Assigning the sRGB colour space” and “Saving your image as a JPEG file”.
Over Sized Images
In step 4 of “cropping a landscape image” I spoke about the landscape image height going above 1200pixels. If your landscape image size height was over 1200 pixels this means your image is more a square format, rather than a landscape. In this case you will need to undo the crop by going to Edit>Undo Crop, or Ctrl Z on your keyboard. Then follow the lesson on “Cropping a portrait image”, (next page).
Perparing a Portrait Image.
Step 1: Open the portrait image you would like to crop. Locate and select your crop tool.

Step 2: In the crop options leave the width blank (do not type 0, the crop tool will not work). In the height box type 1200 px. Leave the resolution blank and the resolution type set to pixels/inch.

Step 3: Next click in the top left hand corner of your image, by holding down the mouse button, drag your cursor to the bottom right hand corner, then let go of the mouse button.
You should now see the crop selection around your image. Also you will see 8 small squares, these are known as handles. If at this point you wish to use only part of the image or would like to change the shape of the crop, click and drag these handles to recompose your image. This will still resize your image to 1200 pixels high because that is the size we entered into the crop tool options in step 2.
Once you are happy with either your full frame crop or your recomposed crop, click on the tick icon on the right hand side of the crop tool options (see below) or hit the enter key on your keyboard. This will apply the crop.
Step 4: Check your image size by going to, Image>Image Size. The image size box will appear. You will now see that your portrait image has a height of 1200 pixels, therefore this image will fit the full height of the club digital projection system. Ignore all the other information in this box. Click OK to close image size box.
Filling unused areas of the projection space.
In the case of portrait and sometimes landscapes images, our images do not fill the projected image space. The space needs to be filled to ensure correct projection. To fill the unused projection space, go to Image>Canvas Size. In the Canvas Size dialog box un-tick the Relative box, change the New Size units to Pixels. In the Width box type 1600, and in the height box type 1200. Select Black for the Canvas extension colour, (this is generally considered to show your DPI’s to their best advantage, but you can choose your own colour). Click OK to accept the new canvas size.
Assigning the sRGB colour space.
All the Digital Projected Images (DPI’s) we are using for competitions need to have the sRGB colour space assigned to them.
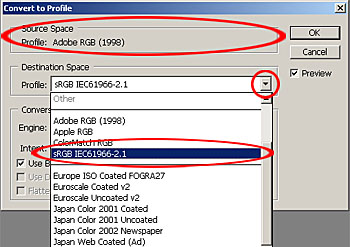
To ensure that your image is using the sRGB colour space, in Photoshop go to Edit>Convert to Profile. The Convert to Profile dialog box will show your colour space. If your Source Space shows “sRGB IE61966-2.1” your image space is correct for projection, so Click OK to exit. If your colour space is showing anything other than “sRGB IE61966-2.1” you need to click the arrow next to Destination Space and select “sRGB IE61966-2.1” from the drop down menu. Click OK to accept these settings. Your Image is now using the correct sRGB colour space for projection.
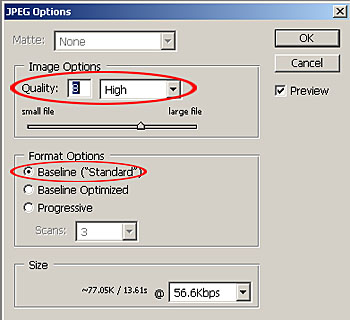
Saving your images as a JPEG file.
To save your images as JPEG file, go to, File>Save As. In the Save As box, select the place you would like to save the image. For this demonstration I have selected My Pictures. Title your image by using rule 5.2.2 of the club Competition rules, (Files must be named in the following revised format: – Sequence no (i.e. 01, 02 or 03), underscore, image title, underscore, members name (e.g. 01_My best image_Member) Note that any comma on the title may be removed to satisfy down load and list processing restrictions) by typing it in the “File Name” box. Then select “JPEG” from the “Format” drop down menu.
Your Image is now sized and saved for digital projection.
4. Conclusion
In practice the above procedure is more simply carried out than expressed and conforming will result in a high quality projected image. However if anyone needs help with the above, please initially approach one of the Competition Secretaries, who will arrange for someone to provide assistance.
It is the responsibility of the author to ensure that their PIs conform to the requirements of the above procedure when presented for competitions. The position of Competition Secretary is in itself a very demanding one, such that it is unreasonable to expect them to correct a non-compliant image. Additionally it is not ethical for competition entries to be altered by anyone other than the author (see section 5.1.1 of the Competition Rules).
If you would like to read the L&CPU Guidelines on resizing and assign colour space, please click on the link below.
To download a printable version of this workshop, click on the link below